
You know if you need a tripod. You just know. Candid shooters know their work generally doesn’t benefit from using one while macro, architecture, and landscape folks wouldn’t be caught dead without one. Anyone who makes huge enlargements likes to use them. So if you don’t normally use a tripod, a fun challenge might be to consider: how does a tripod enable you to make pictures you wouldn’t otherwise bother or be able to make?
I started scribbling down some situations where I’d want a tripod and the length of the list surprised me. It also reminded me about something I once heard from Sam Abell of National Geographic Magazine. He said that by slowing down and using a tripod, you think more about your photo–the light, the composition, and the meaning. I don’t think he meant that you must always use a tripod, but rather that the act of using one forces you out of the moment and into a place where you must reflect on how you photograph and the reasons behind your photography. Those reasons and techniques are too broad and personal to cover here, but we’ll come back to technique in a moment. First, let’s look at the practical things tripods enable us to do with a camera:
* Use maximum or minimum depth of field
* Capture motion blur or other time-based effects
* Maintain the camera position and angle consistently
* Get into low, high, or odd angles not otherwise possible
* Get out from behind the camera and interact with the subject, set, lighting, etc.
* Shoot tethered to a computer
* Hold big telephoto lenses
There’s probably something I’ve left out, but this list may inspire you to think of some new photographic opportunities. The tripod is after all just a tool in service to your ideas!
Using a tripod doesn’t get as much ink as the number of carbon fiber layers used in leg construction, and that’s because using a tripod is obvious, right? Well, I propose that although how to use a tripod is fairly obvious, why to use one may not be so clear. That brings us back to technique—mental technique, not just physical.
One fundamental principle I teach my students (that I also learned from Sam Abell) is to start my composition from the background and then work my way back towards the foreground subject. In this way of thinking and working, the photographer builds her image from the edges of the frame in toward the visual center(s) rather than the other way around. Using a tripod slows the photographer down in a way that helps her consider everything captured in the frame and its relationship to other elements in the frame. Got a tree growing out of your subject’s head? Move yourself or the subject a few inches left or right. Is the subject the same size as everything else? Move closer or use a longer focal length. And by the way, you don’t need a tripod to benefit from this principle!
When using a tripod, something to be aware of is the tendency to extend the legs of your tripod and only shoot from that height. I see people with extended tripods slung over their shoulder, always shooting from about the same height. Bad dog!
Instead, find your camera angle first by starting from the background. Once the subject has caught your eye, look around it for the best background. It might be from a camera position low to the ground, underneath the subject looking up, or it might be up on a nearby ledge or bench. In other words, find the background first then determine if/where/how to setup a tripod for the subject. What lens will you use? What depth of field (and hence shutter speed) do you desire? Therefore, hand-hold or use a tripod?
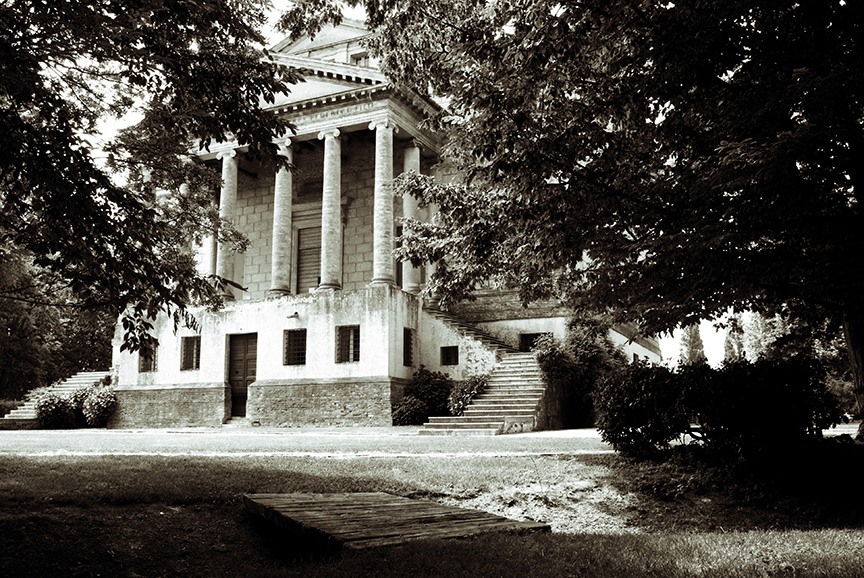
Villa Malcontenta, Venice, Italy. Image ©2007, Laurence Chen, All rights reserved.
For example, I enjoy finding compositions that employ foreground objects as frames for the main subject. Working this way, I see a subject and make it my “background.” I then look for other things to put in front of it. In the shot above, I walked around the building looking for a classic view-through-the-trees camera angle. Given the yard’s landscaping and height of the building, a wide angle lens equivalent of about 35mm was needed to capture the full view and provide a sense of space.
The very small wooden bridge is a nice foreground detail so to include it in the frame with the top of the building the camera needs to be low to the ground and close to the bridge. First I frame this shot hand held to see about where I need to be. Once I find that position, then the tripod is attached to the camera. Holding the camera at the desired height, I open the legs and loosen the leg sections so they drop into place, the last sections hitting the ground where I lock them in place. When doing this, leave yourself a little on the high side. It’s easier to fine tune height by going down rather than up. If you really need to move up and your legs are fully extended, you can use the center column (depending on the lens and total weight being supported) but avoid this as much as possible.
At this point, I know I’ve just completely lost the respect of those who think the center column defeats the whole purpose of a tripod. I’m just going to say that generally speaking, it’s always better to avoid using the center column or to extend it as little as possible. Personally, I will compromise by using the center column if it means the difference between no shot and getting the shot. (In this image, I obviously didn’t use it.)
This scene probably could have been hand-held, but using a tripod just ensured that the horizon was level and it enabled me to stop down to f/13 which is the sweet spot for this particular lens. Finally, using a tripod gave me the time to make a few test shots to nitpick the relationships between the tree branches, the bridge, the building, and the edges of the image frame itself. Incidentally, I also thought about how I would filter it for black and white since the time of day wasn’t providing me with dramatic color.
Finally, when a shot is “in the can” (as they used to say) I flip the ‘pod upside down and let gravity drop the legs back into each other. I do this every time to avoid the standing-height-bias I warned about earlier. This is just one way to work and I hope others might share some of their favorite techniques in the comments.
Tripods certainly require more commitment and effort than say, a new lens. In fact it’s probably safe to say tripods require a different way of working, seeing, and feeling your photography. My mentors and instructors always encouraged me push beyond the literal “first shot” and to keep trying new things to “make the photo [my] own.” They said to use every lens (or focal length) and every tool in the bag to capture the essence of the subject, and a tripod is certainly one of those tools that can open new doors for your image-making.
by Laurence Chen, www.lchenphoto.com, www.buythebestcamera.com
Leave a Reply